
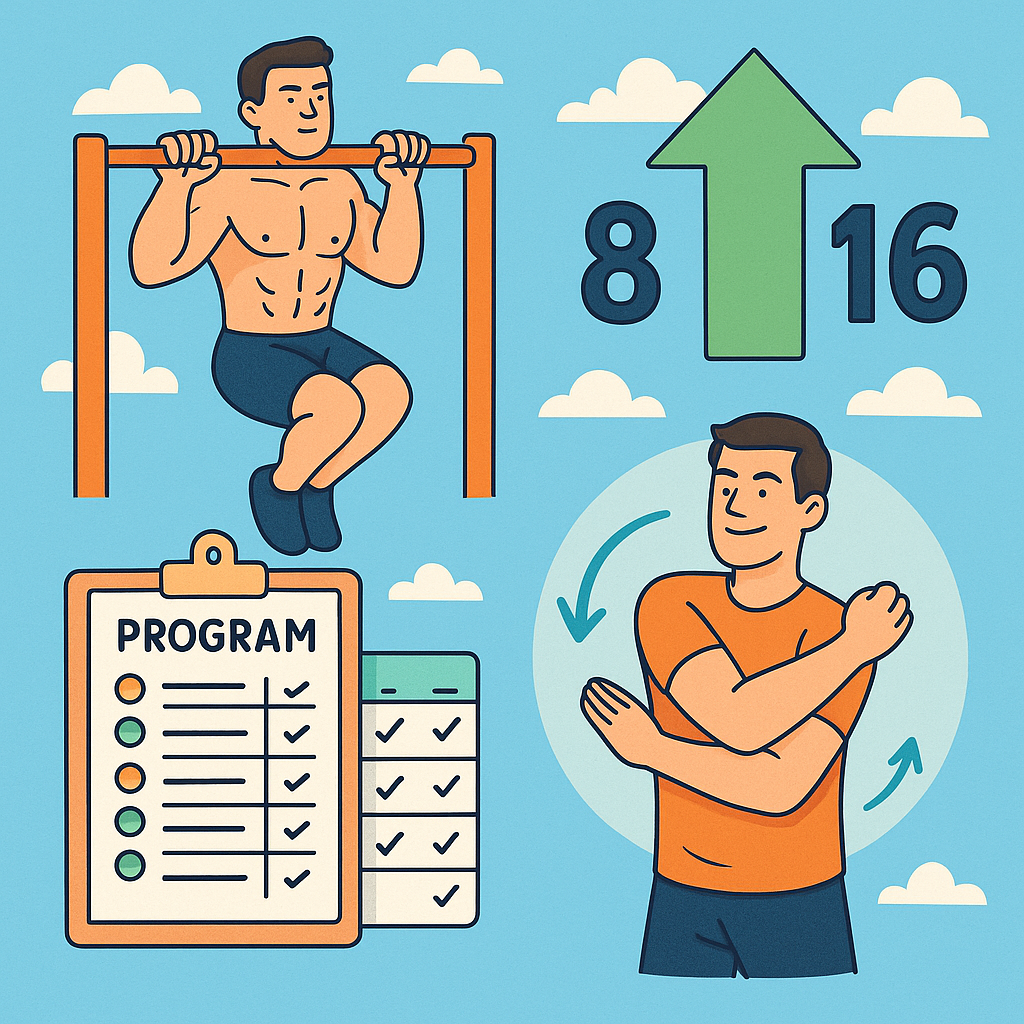
Ready to break your own limits and double your pull-ups in just six weeks? Whether you can currently do one pull-up or ten, this energetic and supportive guide will walk you through every step of a proven 6-week program to dramatically boost your pull-up count. Pull-ups are the ultimate measure of upper-body strength -- they fire up your lats, arms, and core all at once. In this plan, you'll find clear weekly workouts, key warm-up and recovery routines, nutrition tips, and mindset strategies. We'll also point out common mistakes to avoid so you can train smarter and safer. By following this structured approach, you'll not only see rapid gains in your max reps, but you'll feel more confident and energized too. Let's get started on doubling your pull-ups!
Why Pull-Ups Matter
Pull-ups are one of the most powerful bodyweight exercises you can do. They strengthen your entire upper body -- especially the latissimus dorsi, rhomboids, rear delts, and biceps -- while also engaging your core and grip. Building pull-up strength improves your posture, daily function, and overall fitness. Many athletes and fitness buffs praise pull-ups for their ability to test and develop relative strength -- the strength of your body relative to its size. In other words, as you get better at pull-ups, you'll also become stronger and more athletic in other activities (running, jumping, lifting, etc.).
Because pull-ups require you to lift your entire body weight, they're challenging even for fit folks. But with the right training, anyone can make huge improvements. A 6-week focused program gives your muscles and nervous system time to adapt through progressive overload -- gradually increasing the demand on your muscles so they grow stronger. In fact, strength experts stress that pull-ups can feel like they're not improving until suddenly, one day you see a big jump in reps. That's why consistency and a step-by-step plan are essential.
Rather than hoping for magic, we use proven techniques like frequent practice (sometimes called "greasing the groove") and incremental rep increases. You'll train smart -- giving your muscles a little more work each week, then full recovery days to rebuild. Over six weeks, this combination will shock your muscles into growth and often yield almost double the reps you started with.
To stay focused, keep in mind: if you can do 5 pull-ups today, you'll aim for about 10 by the end of week 6. Or if your max is 12 now, shooting for 24. Your exact numbers will vary, but the idea is the same -- set a clear target and watch yourself close in on it each week.
Setting Your Goal
Before you dive into training, establish your baseline. Do a pull-up test: after a thorough warm-up, perform as many perfect pull-ups as you can in one set (chin clearing the bar, full hang start) and write that number down. This is your current max, or "M". For example, if you managed 6 pull-ups, then M = 6. Your goal in six weeks is to reach roughly 2×M reps. We'll explain how the program builds toward that. But first, set some mini-goals:
- Aim to add just 1--2 reps per week. Even a small jump is progress.
- Plan which days you'll train pull-ups and which days you rest. Consistency is key.
- Keep a log (pen and paper or an app) to note your reps each session. Tracking progress is highly motivating and helps you adjust if needed.
Remember: safety first. If you're a beginner, take it slow. Listen to your body, and focus on form. If you can't do even one strict pull-up yet, don't worry -- the following sections cover regressions and technique drills so you can join in this 6-week program and still see huge gains.
Quick Tip: If you start with M pull-ups, a simple schedule might be: "Week 6 goal: 2×M reps." Write it on your mirror or logbook as a positive reminder every day. Each week, update your progress and celebrate small wins (extra rep, better form, etc.) on the way to doubling your pull-ups.
Pull-Up Technique and Form
Good form is non-negotiable. Proper pull-up technique ensures you engage the right muscles and avoid injury. Before adding volume or reps, make sure each pull-up is textbook-perfect: chin clears the bar, legs only lightly assisting (no momentum swing), and full range of motion.
Key form points (each rep should include full range):
- Grip: Grab the bar with an overhand (pronated) grip, hands just slightly wider than shoulder-width. Thumbs should wrap under the bar for safety. Chalk or gloves can help if your hands slip.
- Shoulder "Pack": Begin each rep from a dead hang with engaged shoulders. Pull your shoulder blades down and together (as if pinching them into your back pockets) before initiating the pull. This ensures your lats (back muscles) engage first.
- Body Position: Keep your body straight and tight -- brace your core and glutes. Do not excessively lean back or kick your legs. Your chest should stay up and lead the motion. Avoid a hunched or arched lower back. A slight hollow-body posture (hips tucked under) helps keep you tight.
- Movement: Pull yourself straight up in a vertical line. Lead with your chest -- imagine trying to bring your upper chest to the bar. Avoid jutting your neck forward to get your chin over the bar (the "gooseneck" cheat). Keep your head neutral.
- Elbows and Shoulders: Drive your elbows down and back (as if pulling your elbows into your back pockets), rather than flaring them out. As you reach the top, your chest touches or comes close to the bar.
- Lowering: Lower yourself slowly and with control all the way down to a full hang. Don't just drop; control the descent to build strength and protect your shoulders.
Maintaining excellent form becomes harder as you fatigue, but it's crucial. Quality reps = real progress, even if you do fewer of them. If your form breaks (swinging, half-reps, neck straining), stop the set and rest or switch to an easier variation.
Positive cues to remember: "Chest up, core tight, scapula down." Video yourself or use a mirror occasionally to check for rounding or gipping.

The image above emphasizes grip and shoulder position. Notice how the lifter's hands grip the bar firmly and his shoulders are packed down (scapula engaged) even before he begins the pull-up. This active setup engages the correct muscles and helps prevent common mistakes.
Warm-Up and Mobility
Before every pull-up session, start with a thorough warm-up to wake up your muscles, increase blood flow, and reduce injury risk. Aim for 8--15 minutes of dynamic warm-up exercises. A proper warm-up both physically preps your body and mentally gets you dialed into your workout.
Recommended warm-up routine (dynamic, no heavy static stretching yet):
- Light Cardio (2--3 minutes): Jumping jacks, jogging in place, or jump rope. Get your heart rate up and warm your whole body.
- Arm and Shoulder Circles (1--2 min): Stand tall and make large forward and backward circles with your arms. Keep shoulders loose. This lubricates the shoulder joint.
- Band Pull-Aparts (1 min): Hold a resistance band in front of you and stretch it apart by pulling your hands away, squeezing your shoulder blades together. Release slowly. This primes your upper back.
- Scapula Shrugs / Scap Pulls (1--2 min): While hanging from the bar or standing, practice elevating your shoulders (shrugging up) and then pulling them down (scapular pull). Keep arms straight. These simple moves activate the lats and scapular stabilizers.
- Dynamic Lat Stretch (1 min): Grab a bar overhead and gently swing your body side to side and slightly forward/back with straight arms, feeling a stretch in your lats and shoulders.
- Cat-Camel/Thoracic Extensions (1--2 min): On all fours or standing against a wall, round your upper back (tucking chin) then extend it (chest up). This helps ensure your thoracic spine is mobile for full-range pull-ups.
Your warm-up should end with you feeling a bit sweaty and mobile. Remember the warm-up motto: "Prepare, then perform!" By increasing heart rate and loosening joints, you prime your muscles for the upcoming work.
Core Strength and Hip Position
A strong core keeps your body rigid and safe during pull-ups. It helps prevent arching or swinging. Incorporate core work to support your pull-ups and gain stability:
- Planks and Hollow Holds: Each session or on off days, do planks (30--60 sec) or hollow-body holds (20--40 sec) to reinforce a tight midsection.
- Leg Raises: Hanging or lying leg raises (2--3 sets of 8--12 reps) strengthen your abs and hip flexors. Strong abs help you keep legs forward and avoid arching the lower back. Arching back is a common pull-up mistake, often from letting the feet swing back.
- Dead Hangs: Simply hanging from the bar (active hang) for 15--30 seconds improves grip and decompresses shoulders. Tighten abs and keep legs slightly forward or bent with the feet off the ground. Even passive hanging (let shoulders fully open) can be used sparingly to relax and stretch, but active hangs are best for stability.
By staying tight through your core and glutes, you turn your body into a solid lever. This keeps tension in your lats and prevents wasted movement. A recent study even showed that proper pull-ups engage the abs significantly -- your core is a major player in the movement. Work on core stability throughout the program for the best pull-up performance.
Progressive Overload: The Key Principle
At the heart of this program is progressive overload -- the gradual increase of stress placed on muscles, forcing them to adapt and grow. For pull-ups, progressive overload can mean more total reps, heavier weight, or more challenging variations over time. In practice for this program, we'll mostly add reps and sets.
Remember: slow and steady wins the race. Many people feel frustrated because pull-ups are "hard gains" -- unlike adding 1 kg to a bench press, adding just a couple of pull-up reps might take weeks. But by trusting the process and doing a little more each week, your strength will accumulate.
This program increments your volume systematically: you'll start with sub-maximal sets (e.g. 50-60% of your max) to build endurance, and gradually increase the percentages and sets as weeks go by. We even retest after three weeks and adjust your numbers, essentially basing weeks 4-6 on a new, higher max. That's progressive overload in action.
Don't try to rush it. It's normal for progress to slow at times. In fact, Sean Klein of Programme.app reminds us: "pull-ups are notoriously difficult to improve ... increasing your total pull ups max ... can be months worth of work". The encouraging news: following a smart plan will pay off. Stick to the program, and you'll reap the gains.
Beginner Modifications
If you're an absolute beginner and can't do one strict pull-up yet, this program is still for you! We'll adapt some days to build your foundation so you can start climbing reps. Key beginner tools:
- Assisted Pull-Ups (Bands or Partner): Use a strong resistance band around the bar and one foot (or knee) in the band's loop. Perform pull-ups with the band helping lift part of your weight. This allows you to practice full range pull-ups safely. As ACE Fitness notes, assisted pull-ups "help establish the correct movement pattern for executing the perfect pull-up". Choose a thick band for more assistance or a thinner band as you get stronger.
- Negative (Eccentric) Pull-Ups: Jump or step up so your chin is above the bar, then slowly lower yourself all the way down (take 3--5 seconds). Start with 3--5 reps per set, focusing on the controlled descent. Eccentrics build strength in the exact muscles needed for the upward pull. Over time, lower more slowly or add extra negatives.
- Jumping Pull-Ups: Stand under the bar on a box or bench. Jump into the top position of a pull-up, then hold for a moment, and lower slowly. This is like a hybrid step between jump and negative.
- Scapular Pull-Ups: Hang from the bar with arms straight. Without bending your elbows, retract and depress your shoulder blades to raise your body a few inches. Lower and repeat. These train the very first motion of a pull-up (shoulder retraction). Mastering scapular pull-ups ensures you're using your back muscles properly; without this, you may not engage your lats well and could injure your shoulders. In short, scapular control is pull-up control.
- Chin-Ups (Underhand Grip): If an underhand (palms-facing-you) grip is easier for you, use it. Chin-ups work the same muscles and often allow more reps because they emphasize the biceps slightly more. They are a fine alternative while you build up strength for strict pull-ups.
Use these modifications on the first couple of weeks (especially Week 1) if needed. For example, if you can only do 2 unassisted pull-ups, supplement your sets with negatives or banded reps to hit your target volume. Each week, try to reduce the assistance or increase reps as you improve.
Pro Tip: Even intermediate or advanced trainees can do scapular pull-ups and band-assisted reps occasionally. They are great for warming up your shoulders and practicing form.
Your 6-Week Pull-Up Program
Below is the core 6-week plan to double your pull-ups. It's based on splitting moderate-intensity sets across each training day and progressively upping the volume. You'll train pull-ups three days per week (e.g. Monday, Wednesday, Friday) and use other days for light activity or rest. On training days, you'll perform multiple sub-maximal sets, with a higher-intensity final set. Here's the breakdown:
- Weeks 1--2: Start with your current max (M). Each training day, do 6 sets of 50% of M, spread throughout the day or back-to-back with short rest. Then at the end of the day, do 1 final set of 75% of M. For example, if M = 8 pull-ups: 6 sets of 4 reps each (50%) + 1 set of 6 reps (75%). Aim for 3 training days (Mon/Wed/Fri).
- Week 3: Increase the intensity slightly. Do 7 sets of 60% of M per day, plus 1 set of 90% of M at the end. Using the example M = 8, that's 7×5 reps (60% of 8) + 1×7 reps (90%). After completing week 3, take 3 days off completely to rest. Then re-test your max pull-ups on day 21 (to see your new M). According to the plan, you should be up about ~25% from the start by now.
- Weeks 4--5: Now use your new max (if you improved) as M. Mirror the structure of weeks 1--2. Do 6 sets of 50% of new M + 1 set of 75% of new M each training day. For example, if your retest max is now 10, do 6×5 reps (50% of 10) + 1×7--8 reps (75%). By the end of week 5, you should comfortably hit the 75% sets.
- Week 6: Final push. Perform 7 sets of 60% of M + 1 set of 90% of M each day. In our example with M = 10, that's 7×6 reps + 1×9 reps. These high-rep sets are tough, but they prime your muscles for the big goal. After completing the 7th week's workouts, rest 3 days and then re-test your pull-up max.
This program uses frequency and volume to build endurance first, then raises the workload. By resting after weeks 3 and 6, you give your muscles time to recover and grow before retesting. Many people who follow this method find that by the final test (end of week 6), their max pull-ups have roughly doubled relative to week 1.
Weekly Schedule Example
Here's one way to schedule your workouts each week (you can adjust days to fit your routine):
- Monday (Pull-Up Day): Main pull-up workout (6--7 sets per plan).
- Tuesday: Active recovery or light cardio (walking, stretching, core work).
- Wednesday (Pull-Up Day): Main pull-up workout.
- Thursday: Mobility work (yoga, band stretching, light band pull-aparts).
- Friday (Pull-Up Day): Main pull-up workout.
- Saturday/Sunday: Rest or fun active recovery (e.g. hiking, swimming, or playing sports).
On non-pull-up days, you can still "grease the groove": do 1-2 very light sets of pull-ups or scapula holds just to keep practicing the movement. These should be about 30--40% of your max -- not tiring. For example, if M = 10, you could do 1 set of 3--4 pull-ups on Tuesday just for practice. Keep it easy, or skip them entirely if your body feels beat.
Pro Tip: Spread the 6--7 sets across the workout day as needed. You might do 2 sets in the morning, 2 at lunch, 2 in the evening on Mon/Wed/Fri. This approach (a form of Greasing the Groove) keeps you fresh for each set and taps into the neuromuscular adaptation that Pavel Tsatsouline talks about. Just be sure no set is taken to failure -- always stop one or two reps short of max to avoid excess fatigue.
Sample Workout (Training Day)
Here's what a pull-up day might look like (adjust reps for your M):
- Warm-up (10 minutes total): Light jog/jump rope (2 min), arm circles (forward/back, 10 each), band pull-aparts (2×15), scapular pull-ups (3×5), dynamic lat stretch.
-
Pull-Up Sets: (Examples if M = 10)
- Do 6 sets of 5 reps (50% of 10). Rest 1--2 minutes between sets.
- Final Set: 1 set of 8--9 reps (75% of 10). If you can't hit 9 at first, do as many as possible with good form.
-
Accessory (Optional): After the pull-up sets, if you have energy, do 2--3 sets of a complementary exercise:
- Australian Pull-Ups (Bodyweight Rows): Using a low bar or TRX, do 10--12 reps. This builds mid-back strength.
- Hollow Body Hold: 3×20--30 sec, to reinforce core.
- Cool-down: Stretch lats, biceps, chest. Foam roll upper back and shoulders (see Recovery Tips below).
Repeat this on Mon, Wed, Fri. Increase reps or sets according to the above weekly plan.
Be Flexible: If you're traveling or short on time, at least do the minimum: try 3--4 sets during one part of the day. The structured split throughout the day is ideal, but doing them all at once is better than skipping.
Recovery Protocols
Muscles grow outside the gym, when you rest and refuel. Proper recovery will keep you performing well and avoid burnout. Key recovery tips:
- Sleep 7--9 hours per night: Growth hormone surges and muscle repair happen during sleep. Inadequate sleep blunts gains. Aim for quality sleep every night (power down screens, have a cool dark room). Johns Hopkins research reminds us that sleep is a "metabolic reset" for muscle and tissue recovery. In fact, most adults need 7--9 hours; skimping can literally slow your strength progress.
- Post-Workout Nutrition: Within ~90 minutes after training, eat a mix of protein and carbohydrates. A 3:1 carb:protein ratio is ideal. For example, a chocolate milk (1 cup) and a banana, or peanut butter on toast with fruit, or a turkey sandwich. This helps replenish glycogen and kickstart muscle repair.
- Protein Intake: To build muscle from pull-up workouts, hit your protein needs. Experts advise about 1.6--2.2 grams of protein per kg of bodyweight per day for muscle gains(for a 150-pound person, about 110--150 grams daily). Spread protein across meals (e.g. eggs or Greek yogurt breakfast, chicken lunch, fish or tofu dinner, and protein snacks). High-protein foods like lean meats, dairy, beans, and nuts will support your recovery.
- Stay Hydrated: Drink water throughout the day. Pull-ups make you sweat and lose electrolytes, so sip water before, during (if needed), and after workouts. A quick guideline: about 16--24 ounces of water after training helps restore fluids.
- Foam Rolling & Stretching: Spend 5--10 minutes after your workout foam rolling key areas (lats, upper back, shoulders). According to studies, foam rolling can reduce muscle soreness and speed up recovery for the next workout. Stretch your lats (reach overhead and lean away from the bar), biceps (wall pec stretch), and mid-back. This helps maintain flexibility and prepare your muscles for the next session.
- Active Recovery Days: On your off days, do light movement -- a brisk walk, gentle cycling, or even a leisurely swim. This boosts circulation and reduces stiffness. Avoid heavy pulling motions on rest days, but feel free to do active hangs (just hanging or very light band curls) to alleviate muscle tension.
- Listen to Your Body: If you feel unusually sore or fatigued, it's okay to add an extra rest day or do fewer reps. Pushing through sharp pain or extreme fatigue can lead to injury. Better to slightly undertrain one day than overtrain and derail progress.
Combining all these recovery strategies ensures you come back stronger each workout. Remember: you can't out-train a bad recovery plan. Follow the sleep and nutrition advice, and your muscles will respond by growing stronger and ready for more pull-ups.
Nutrition Tips for Pull-Up Gains
Eating right will turbocharge your pull-up improvements. Here are simple nutrition guidelines:
- High-Protein Focus: Include a good protein source at every meal. Foods like chicken breast, turkey, fish (tuna, salmon), eggs, Greek yogurt, cottage cheese, tofu, and legumes are excellent. High-protein meals stimulate muscle repair and growth. For example, grill chicken breast with veggies for lunch, or have an omelette for breakfast. Aim to meet that 1.6--2.2 g/kg guideline overall.
- Balance Carbs and Fats: Carbs give you energy for workouts. Eat whole-grain bread, rice, oats, sweet potatoes, fruits, and vegetables. For instance, oatmeal with banana in the morning, or brown rice with dinner. Fats (nuts, avocados, olive oil) help keep hormones balanced. A well-rounded diet ensures you recover well and perform optimally.
- Post-Workout Snacks: After your pull-up session, get some protein + carbs into you. Ideas: a protein shake with a banana; turkey sandwich; Greek yogurt with berries and honey; chocolate milk. A famous ratio is roughly 3 grams of carbs for every 1 gram of protein. This aids muscle glycogen replenishment and protein synthesis.
- Don't Skip Whole Foods: Supplements are fine, but real food is best. While a protein powder can help you hit targets, try to get most protein from real foods that contain micronutrients. Foods rich in vitamin C (berries, citrus) and magnesium (leafy greens, nuts) also support muscle function and recovery.
- Caloric Intake: You don't necessarily need to eat tons of calories, but don't eat so little that you can't recover. If you're under-eating, you might feel more fatigued. Make sure to at least maintain your weight or eat slightly above maintenance if you want to gain strength quickly.
- Hydration (again!): Carry a water bottle. Many beginners forget water's role in performance. Thirst can subtly degrade performance and recovery, so sip regularly.
Proper nutrition is the fuel for your training engine. In summary: high-quality proteins, ample carbs (especially around workouts), healthy fats, and plenty of water.
Mindset and Motivation
Building up your pull-ups is as much mental as it is physical. Keep an energetic, positive mindset throughout the 6 weeks:
- Stay Consistent: The plan only works if you stick to it. Treat your pull-up days as appointments. When motivation dips, remember why you started and how far you've come. Small consistency beats occasional bursts of effort.
- Focus on Progress, Not Perfection: Some days might feel tough. Celebrate any improvement -- an extra rep, perfect form, or hitting a tough set. Each milestone is a win. According to fitness experts, it's the steady incremental overload that wins in the long run.
- Visualize Success: Picture yourself effortlessly doing those double reps. Visualization can boost confidence and performance. Some athletes even try cues like "When I walk by the pull-up bar, do 2 pull-ups!" (a trick to integrate practice into daily life).
- Use a Training Log: Write down what you do each workout (sets, reps, any notes). Seeing numbers on paper go up is highly motivating. For example, "Week 1, Day 1: 6×5 + 1×8; Week 3 retest: 12 reps!" Tracking adds accountability.
- Train with a Friend or Group: If possible, partner up or share your goal with a workout buddy. A little friendly competition or encouragement goes a long way.
- Mindfulness and Patience: Recognize that increasing strength takes time. It's normal for rep increases to come in bursts. One week you might not see much change, then suddenly a few more reps show up. As one expert notes, "Strength takes time, especially in this movement". Be patient with yourself.
- Stay Safe: Remember your purpose is long-term improvement. It's better to do one perfect pull-up than two sloppy ones. If you feel fatigue creeping in, better to pause and rest. Injuries only derail progress.
Above all, have fun with it. Mix up your grip (every few weeks, try chin-ups or neutral-grip pull-ups) to keep things fresh. Pump some music, or listen to an upbeat podcast while you train. The more you enjoy the process, the easier it is to stick with it.
Common Mistakes to Avoid
Even small errors can slow progress or cause injury. Watch out for these common pull-up pitfalls:
- Half-Reps (Incomplete Range) -- Many beginners cheat by doing shallow pull-ups (e.g. chin not fully over bar). Full range (chin over bar and full hang) recruits all muscles and builds real strength. Studies show full-range pull-ups produce better gains than partial reps. Fix: Don't start lowering unless your chin has fully cleared the bar. Quality over quantity.
- Neck Straining ("Gooseneck") -- Poking the head forward to clear the bar is a cheat. It stresses your neck. Keep your head neutral and use your back muscles to lift. If you feel yourself leaning in with the neck, start descending or regress to an easier pull-up.
- Hunched or Rounded Back -- Curling your chest inward reduces power and can load your spine incorrectly. Always lead with your chest and focus on keeping the upper back extended at the top of the pull-up. Imagine trying to show a chest logo to someone in front of you.
- Arching Lower Back -- Swinging legs behind and arching your lumbar spine disengages your core and makes the exercise easier in a bad way. It can also hurt your lower back. Keep a slight hollow body (tuck hips forward) or cross your legs behind with knees bent to avoid this arch. Engage abs.
- Pulling with Arms Only -- If your arms end up doing all the work, you're missing the point. Focus on initiating the pull with your elbows and shoulder blades. If the first “pop” of the pull comes from lats and traps (shoulder adductors), that's correct.
- Momentum / Kipping (When You Shouldn't Kip) -- Using a big swing or kip to get up is not part of this program (that's a different CrossFit technique). Swinging wastes effort and can lead to uncontrolled movement. Pull-ups should be controlled. If you find yourself swinging, slow down your tempo.
- Dropping Too Fast (Poor Negatives) -- Letting go at the top and plopping down quickly for the next rep saves energy in the short run but hurts strength gains and joints. Control your descent. Even on your easy practice sets, lower slowly.
- Not Engaging the Scapula First -- Starting the pull with arms straight and biceps can happen if you don't retract your shoulders at the start. Always begin each rep from a dead hang with shoulders “set” (see technique section). If you just jump up without prep, you bypass important back activation.
- Training to Failure Too Often -- Going to absolute failure every set can lead to burnout and injury. Instead, stop 1-2 reps shy of failure on your working sets (leave a little “in the tank”) to train more consistently. Failure sets should be rare, not routine.
- Skipping Rest Days -- Overtraining can stall progress. Your muscles need rest to rebuild. Stick to the schedule, and don't do heavy pulling on off days.
By avoiding these mistakes, each rep you do will count. Slow down, focus on form, and make each pull-up a perfect one. Your efficiency in each rep pays off in faster gains.
Example 6-Week Plan (Summary Table)
Below is a summary of the 6-week pull-up program. Adjust the numbers to fit your current max (M). “Sets” refers to the number of pull-up sets per training day, and “Final Set” is the challenging last set at higher intensity.
| Week | Sets per Pull - Up Day | Reps per Set | Final Set (at 75 -- 90% of M) |
|---|---|---|---|
| 1--2 | 6 sets | 50% of starting max (M) each set | 1 set of 75% of M (at day's end) |
| 3 | 7 sets | 60% of starting max each set | 1 set of 90% of M |
| (Rest and retest max, new M) | |||
| 4--5 | 6 sets | 50% of new max (after retest) each set | 1 set of 75% of new M |
| 6 | 7 sets | 60% of new max each set | 1 set of 90% of new M |
Table: 6 - Week Progressive Pull - Up Plan. Follow this each training day (e.g. Mon/Wed/Fri). After Week 3 and Week 6 rest 3 days, then perform a maximum - effort test to track progress.
Start small: if your M is 5, then 50% is 2.5 (round to 2 or 3 reps) and 75% is about 4 reps. As your M goes up, the actual reps will increase.
By the end of week 6, the program expects you to be doing significantly more reps per set, meaning your max (tested after rest) should be about double your initial max.
Staying Motivated and on Track
- Celebrate Wins: Every rep is progress. Give yourself a thumbs - up for each new rep or every week you stick to the plan.
- Visualize Success: Picture yourself confidently doing 2× as many pull - ups. Let that image drive you on tough days.
- Accountability: Tell a friend or post on social media about your goal. Or better yet, train with a buddy. Having someone else know your goal can push you to stay committed.
- Mix It Up (Safely): Every couple of weeks, you might swap a normal pull - up day with chin - ups or neutral - grip pull - ups to work muscles slightly differently and keep it interesting. But keep your main focus on the standard pull - up pattern for rep - count progress.
- Listen to Feedback: If your grip fails during a set, you may need to add grip exercises (farmer's walks, dead hangs) to your routine. If your shoulders ache, revisit form or add more warm - up. Let the little signals guide small adjustments.
Final Thoughts
Doubling your pull - ups in six weeks is an ambitious goal, but with discipline and this comprehensive plan, it's absolutely within reach. Pull - ups train your body in a way that builds real functional strength and confidence. As you progress, you'll feel stronger and more capable not just in your workouts, but in everyday tasks (like carrying groceries, climbing stairs, or simply playing with kids) because your relative strength will be soaring. Remember the key elements: Consistent practice (Grease the Groove), progressive overload, thorough warm - ups, good nutrition, and adequate recovery. Avoid common mistakes like partial reps and cheating form. Keep a positive, patient mindset - muscle and skill take time to develop.
Stay energized and supportive of yourself. Even if you hit a plateau mid - program, push through, and know that breakthroughs often happen after sticking with it. By week 42, when you test again, prepare to be thrilled by your results - your pull - up count could very well have doubled or more.
You've got this! Pull up, hang on, and soon you'll be pulling up twice as far.


Leave a comment
All comments are moderated before being published.
This site is protected by hCaptcha and the hCaptcha Privacy Policy and Terms of Service apply.